Good Tips for Troublesome TMJ

Why Are Special Imaging Tests Ordered?
September 13, 2022
Hiking Safety for New Hikers
September 13, 2022Tips for a Troublesome TMJ
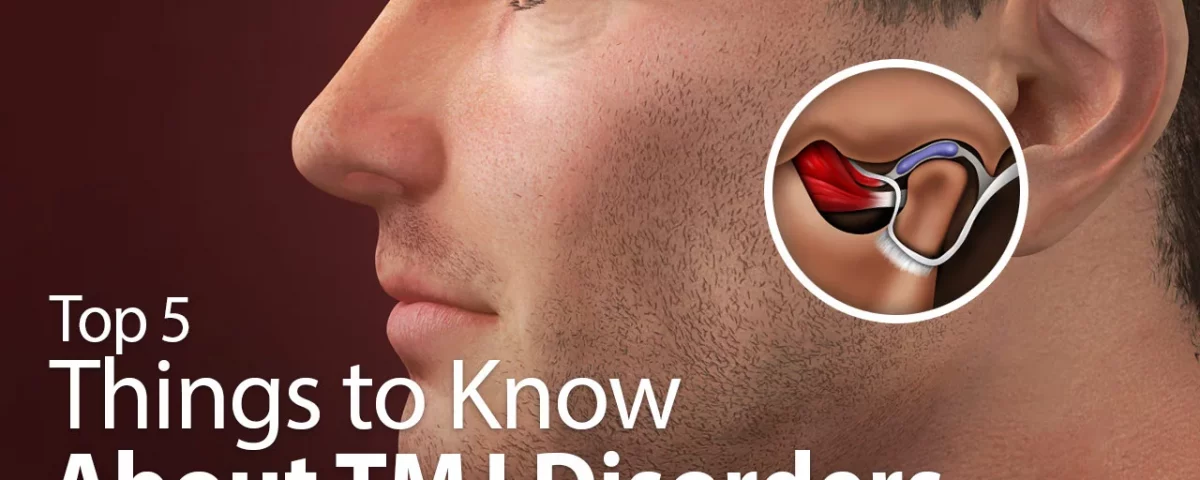
The anatomical name for the jaw is the temporomandibular joint or TMJ. The TMJ is made up of several parts including the mandible (lower jaw) and the temporal bone (skull bone) which provides a socket. Similar to the spine, a disc sits between the mandible and the temporal bone socket. The disc allows the joint to glide smoothly when opening and closing and the entire joint is held in place by ligaments and muscles. Pain in the TMJ can come from injury or trauma (like car accidents, or a blow directly to the TMJ or elsewhere on the jaw), overactive jaw muscles (causing clenching or grinding of teeth), inflammatory disease, arthritis, genetics, growth disorders, poor postures, and daily habits. Very commonly pain is due to a combination of these factors rather than one single cause.
The correct term for pain and problems involving the TMJ is called TMJ dysfunction or TMJD. While pain is the most common symptom, not everyone experiences pain in the TMJ. Other symptoms include facial muscle discomfort; clicking, grinding or locking; headaches; dizziness; difficulty opening or closing the mouth; pain when talking, chewing or yawning; ear pain and tinnitus (ringing in the ears).
If you’re unable to fully open and close the mouth or recently suffered an injury to the mouth or jaw, it’s important to seek medical attention. Although in many cases, mild pain and discomfort associated with the TMJ is temporary and can be self-managed or relieved with non-surgical care. Here are some simple exercises and common do’s and don’ts when dealing with TMJ dysfunction or pain.
DO:
- Apply heat or ice for 15 to 20 minutes on the TMJ
- Massage the joint and surrounding muscles
- Change to a soft food diet
- Cut tough food into smaller pieces
- Regular exercises according to your doctor’s advice
- Become aware of clenching or grinding the teeth
DON’T (or avoid):
- Chew excessively on nails, gum, pen tops, inside of the cheek, etc.
- Sleep face down
- Eat hard and chewy foods
- Resting the jaw on your hand or using your shoulder to hold a phone to the ear
- Engage in bad posture when sitting or lying to reduce prolonged over-stretching of the TMJ ligaments and surrounding tissues
TMJ Exercises
- Relaxed Jaw Position- Lightly place the tongue at the top of the mouth behind upper front teeth and allow the teeth to come apart while relaxing the jaw muscles. Repeat 4 to 7 times.
- Partial Opening Exercise A
- Keep tongue on the roof of the mouth.
- Place one index finger on the TM team,
- Place the other index finger on the chin.
- Relax to allow the lower jaw to partially drop down and back with help from the chin’s index finger.
- Use a mirror to monitor partial jaw opening ensuring the chin drops straight down and tongue stays up.
- Repeat 4 to 7 times.
- Partial Opening Exercise B
- Keep tongue on the roof of the mouth.
- Place one finger on each TMJ.
- Relax and allow the lower jaw to partially drop down and back bringing the chin towards the throat.
- Use a mirror to monitor this partial jaw opening ensuring the chin drops straight down.
- Repeat 4 to 7 times.
- Full Opening Exercise A
- Keep tongue on the roof of the mouth.
- Place one index finger on the TMJ.
- Place the other index finger on the chin.
- Relax to allow the lower jaw to fully drop down and back with the help of the chin‘s index finger.
- Use a mirror to monitor full jaw opening, ensuring the chin drops straight down and tongue stays up.
- Repeat 4 to 7 times.
- Full Opening Exercise B
- Keep tongue on the roof of the mouth.
- Place one finger on each TMJ.
- Relax to allow the lower jaw to fully drop down and back bringing the chin towards the throat.
- Use a mirror to monitor full jaw opening, ensuring the chin drops straight down.
- Repeat 4 to 7 times.
- Mandibular Stabilization Exercise
- While maintaining and holding the jaw in a neutral position, gently apply pressure to the jaw using the thumb or index finger.
- Start with the thumb placed on the bottom aspect of the chin and gently push or apply pressure upwards. Try to keep tongue on the roof of the mouth. Hold for 2-3 seconds.
- Repeat this procedure with the thumb placed on the right and then left side of the chin.
- Repeat all three positions 5 times.
- Advanced Mandibular Stabilization Exercise
- Place knuckle of the index finger between the top and bottom teeth.
- Remove it, keeping the teeth separated one knuckle distance apart.
- Gently apply pressure to the jaw with the thumb or index finger as described in the previous mandibular stabilization exercise (bottom of the chin, left side of chin, right side of chin).
- Hold and resist each thumb position for 2 to 3 seconds and repeat all three positions 5 times.
- Cervical Retractions or Chin Tucks
- While standing or seated with shoulders back and chest up, slowly and gently bring the chin straight back to create a ‘double chin’. Keep your gaze straight-ahead and do not bend the head up or down.
- Hold in the tucked position for 2 to 3 seconds and repeat 8 to 10 times.
—
Article by Dr. Deryk Harting one of the members of Chambers Medical Group’s team of car accident chiropractors who offer a variety of treatments and therapies ranging from diagnostic testing to various soft tissue therapies for car accidents and injuries in Kentucky.
If you or somebody you know has been in a car accident, be sure that you seek medical attention from a car accident doctor or car accident chiropractor to treat your injuries. Visit Chambers Medical Group to receive world-class medical treatment for your injuries.
Chambers Medical Group has car accident medical clinics in the following locations:
- Car Accident Medical Clinic in Tampa
- Car Accident Medical Clinic in Plant City
- Car Accident Medical Clinic in Brandon
- Car Accident Medical Clinic in Lakeland
- Car Accident Medical Clinic in Sarasota
- Car Accident Medical Clinic in Louisville
- Car Accident Medical Clinic in Lexington
- Car Accident Medical Clinic in Florence


